Race RZR – Part 3

If you’ve been following along on our buildup of our race RZR, you’ll know that we’re trying to build a budget racer capable of racing both short course and desert races. Here’s what we completed in the June/July issue for Stage 3:
1) RPM Fab Front and Rear Bumpers
2) Staun Internal Beadlocks mounted on Douglas Red Label .190 Wheels
3) Metal Tech Off-Road Roll Cage
4) Beard Super-TZ Suspension Seats
5) Fuel Cell
6) Wrist Restraints
For Stage 4, we’re going to be covering:
1) RPM Fab Roof and Door Skins
2) Affordable Power Coating
3) Mafia Industries Long Travel Kit
4) Afco/Makin’ Trax M2 Double Adjustable Racing Shocks
5) Gorilla Axles
6) Riot Fab Doors and Aluminum Skins
7) Adjusting seats for more comfort & leg room
8) Beefed up fuel cell
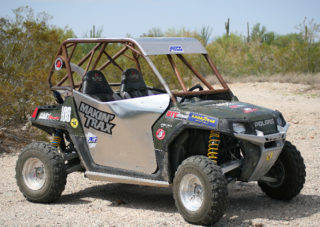
One area that needed attention was the roof and side door skins. So, we took the RZR over to RPM Fabrication to get the door skins and roof made. After reviewing the door tubing, Ian decided it needed a little reworking to make the skins fit a little better, so he reworked the front part of the doors. For the roof, he did a fantastic job of keeping it from rattling and provided a nice area for us to block some sun and put a nice big logo on the front.
We’ve always been a loyal supporter of Affordable Powdercoating in Phoenix. They’ve taken great care of us over the years from the Project Rhino, Project RZR, Project Ranger XP, and now the Project race RZR. They have nearly any color and texture you could imagine to powdercoat your UTV, truck, buggy, rail, whatever powersport toys you might have. For our race RZR, we’ve chosen a bright silver metallic for the A-arms, and we wanted to make sure they were done before heading to CA for the install. Like always, the quality and attention to detail from the folks at Affordable Powdercoating are the reasons we always go back.

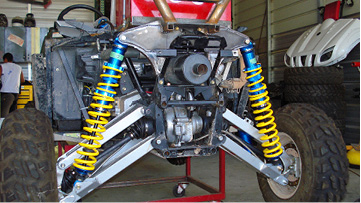
From here, the RZR was picked up by Jack from Makin’ Trax Suspension and taken back to CA to begin the installation of the Mafia Industries Long Travel Kit and Makin’ Trax AFCO M2 Double Adjustable Racing Shocks. One of the most sought after items on a UTV is a long travel suspension. The main couple of reasons are it provides more stability in high speed cornering and more travel to absorb the bumps more efficiently. It’s also one of those things a lot of people opt not to get because of the cost. But, even though it might cost half the cost of a stock RZR, it’s the single biggest impact any one part can make to the comfort and performance of your UTV, period. For our race RZR, we opted to use RZR Mafia’s 6 over long travel suspension combined with 9” Afco Racing/Makin’ Trax Suspension fully adjustable shocks. Mafia’s long travel kit includes upper shock towers, upper and lower A-arms front and rear, bushings, brake lines, and all miscellaneous hardware needed to install it. So, in the mix of trying to get this thing together for some races, Steve at Makin’ Trax Suspension offered to put it all together in combination with his shocks. Needless to say, installing a long travel suspension is a daunting and time-consuming task. One of the things we quickly realized is that not all frames are created the same. And, not to knock Polaris’s quality control or anything — we’d raced two challenging races before this, not to mention all the beating we put on it during testing — but there were definitely items that needed some elbow grease to install. But, Steve got it all installed, and it was time to hang the shocks. The shocks we chose to run are the top of the line racing shocks that Makin’ Trax and Afco Racing produces. They have both rebound and compression dampening control, nitrogen filled reservoirs, pre-load adjustments, and dual rate springs. As you might recall, we’ve run both their MT1’s and MT2’s previously on this RZR with great success on the stock A-arms. The main reason we’ve gone to a fully adjustable shock is because we’re planning on running both short course and desert races with one machine. This can become quite challenging, so having the adjusters is something we thought would prevent us from having to run two different shock/spring setups.
One of the other necessary items of installing long travel is 6” longer axles. We’ve used Gorilla Axles in the past with great success on our project Ranger XP, project Rhino, and we’ve never had any problems out of them. So, it was an easy decision to run them again on our race RZR. There’s a couple of benefits of running these axles over just replacing the center shaft and using the stock CV joints. Gorilla builds both a stronger CV cage and axle shaft. Plus, you don’t have to spend hours taking apart the stock axles and replacing the center shafts, which is a royal pain in the butt. Plus, Gorilla axles come with a 1-year warranty from breakage, so they’re really hard to beat. When installing them, they can require quite a bit of force to get them to pop into place inside the differentials, so don’t worry if you feel like you’re going to break something. Lube up the splines with a good waterproof axle grease and pop them in using a rubber mallet.

From here, we quickly realized that our idea of running 1” shorter than recommended shocks was going to cause a slight challenge. Actually, the Afco Racing Shocks are 1” shorter stroke, but measure out to be only ¼” shorter overall length at full extension. Doesn’t sound like much, huh? Well, the front is fine, but the rear needed to be adjusted to keep from dragging the undercarriage when at full compression. Riot Fab out of California had it handled. In fact, they custom fabricated the upper shock tower into the frame, providing a whole lot more support and bracing to the shock tower and frame surrounding that area. We built it so at full compression we have roughly 3” of ground clearance to compensate for tire compression off the big jumps. In the front, we have about the same clearance at full compression, so we’re happy with where it ended up. The struggle we have is keeping the RZR low for cornering in short course racing, but high enough to clear the big ruts in desert racing. One nice thing about the Makin’ Trax/Afco Racing shocks is that we can put extended adjusters on the ends to further raise the ground clearance if we think we’ll need it in the desert racing. Having flexibility is nice, because our car is pulling double duty.
While getting the rear shock towers fixed up, part of racing is testing, right? Well, the roll cage from MTO works great, but the doors needed a little reworking. In repairing the doors, we opted to go a little wider to help clear our upper bodies and arms a little better. Riot Fab knew exactly what we needed by providing just enough clearance for both of our tall drivers. Both James Hill and John Pacheco do some excellent fabrication work. In fact, James is #1 in the super stock class in the M4SX series in California. Maybe someday we’ll be as good as he is!
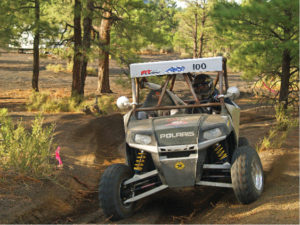
From here, we met up with Steve in Salome, AZ to do some initial testing after all of the above was installed. Wanting to get as much footage as possible, I quickly hooked up our Edge In-Car Cameras to the race RZR, facing both front and rear to catch all the action. Steve was as excited as I was to get in the RZR and see the dramatic difference. So, to reward Steve for all his work, our initial ride was with him driving and me riding. And, boy, can I tell you that the difference is beyond dramatic. Long travel suspension mated with properly dialed in shocks is a world of difference over stock or even stock A-arms with the Afco’s we had been using. It’s ridiculous how much the extra 6” of suspension travel affects the ride quality of these UTVs. And, even Steve admitted that we’re not quite there yet with the final adjustments. Ultimately, if you want the best ride possible, you have to be willing to tinker with the shocks to get them just right for your riding style. Yeah, Steve can definitely get you very close, and for most people’s riding style, it’s perfect. But, Steve would second me on this one that I’m a fanatic about milking every last ounce of performance out of this thing. I think Steve hates me by now, but I know when he gets something dialed in, it’s perfect, and that’s exactly what we had with the stock A-arms and Afco MT2’s.

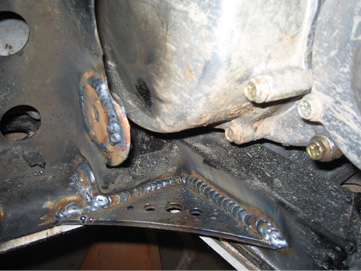
Anytime when adding long travel suspension, it is necessary to beef up the stock frame. Additional gussets are a good idea to reduce frame stress added from increased leverage that the stock frame was not intended for. Riot Fab welded in a number of these corner supports as well as washers to give more strength to the A-arm attachment points. This increases the possibility that our A-arms will not be ripped out of place due to the abuse that we will be putting our car through at the race track.
Once we got the RZR back, I finally decided it was time to send Dale at Dirty Dawg Performance the head to get ported and polished. Unfortunately, when removing the head, I dropped some dirt down in the cylinders so I had to remove the cylinders to clean it up. Well, unfortunately for us and just in time to race the first race of the new Saturday Night Fever race series, I broke a couple of piston rings trying to slide the cylinders back over the pistons. Of course nobody had them in stock locally, so that race was out the window. So look for a full report of the DDP ported and polished head along with their header pipe with larger gasket catch the next issue. Dale also said we needed to try a different primary clutch spring, so stay tuned for those results, as well.
During this time, we also noticed that our fuel cell was leaking badly. This obviously isn’t safe or good for gas mileage, so we shipped it back to the company that modified it for the stock sending unit to get repaired. And, for us, it gave us a little time to focus on some things we needed to do that might have never gotten done had we fully assembled the car. So, with having two tall 6’2-6’3” drivers in the compact cockpit of the RZR, we opted to move the seats to achieve a little more comfortable riding position. For Troy, he’s got much longer legs than I do, which resulted in him having to pad the bottom of the dash for his right knee. For me, the Beard seats had a tad too much layback for me, which was causing my body to slide forward and hit my knee on the left side door tubing. So, after giving it some thought, we cut the stock angle brackets off the tubing behind the seats and moved them up approximately 2”. This allowed us to move the seats back roughly 3” due to the angle and more clearance we had behind the seats. But, obviously, we had to move the front mounting points back, as well. So, we used some 3”x1” tubing to act as our resting point for the front of the seat pans. From there, we cut the stock bars that hold the top of the seat pan securely and drilled holes in the 3”x1” tubing for their new locations. After tacking it up, we tested the new seating position and found that for both of us it was going to work very well. Troy’s knees seem to clear the dash better and the more upright seating position will hopefully keep my left knee from hitting the door bars as often.
So, although we’d like to say we got the RZR back together for the Saturday Night Fever and the Whiplash Snowflake Race, we missed both due to my inability to wrench. I guess that’s why they call them professionals for a reason. But, it’s exciting to think that there are only a few miscellaneous things to complete on the RZR till it’s fully race ready for both desert and short course racing. We still need to get lights, some radios, pumper helmets, and probably a GPS to get us closer to being 100%. Stay tuned for the next issue as we begin to wrap up our Project Race RZR. Of course, we’ll still be providing all the race coverage of our wins, and I guess our losses if we have to.

